
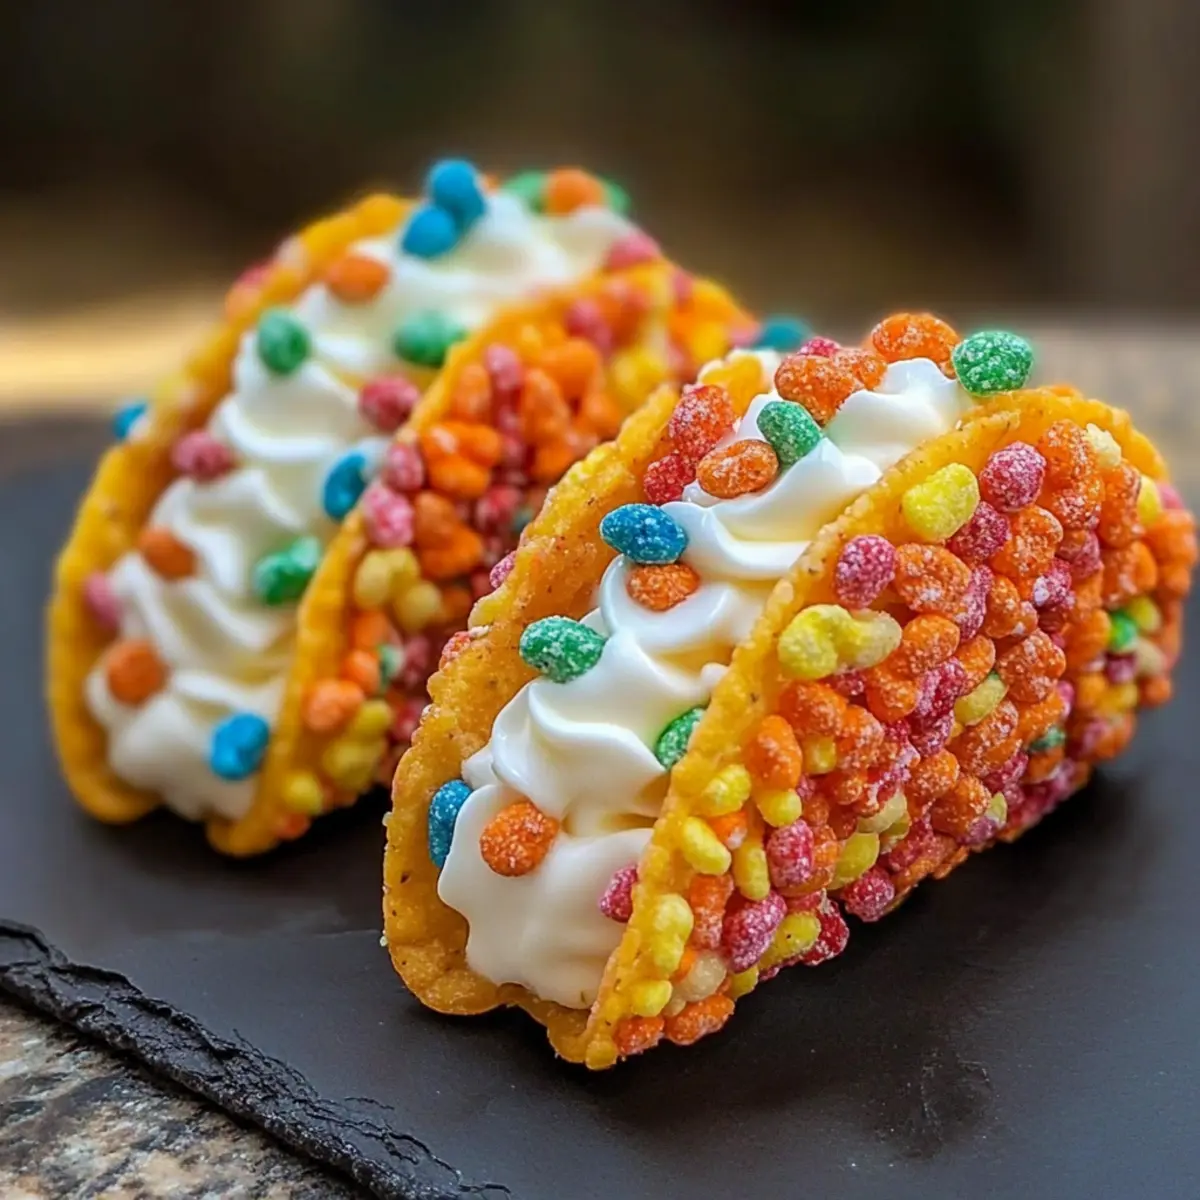
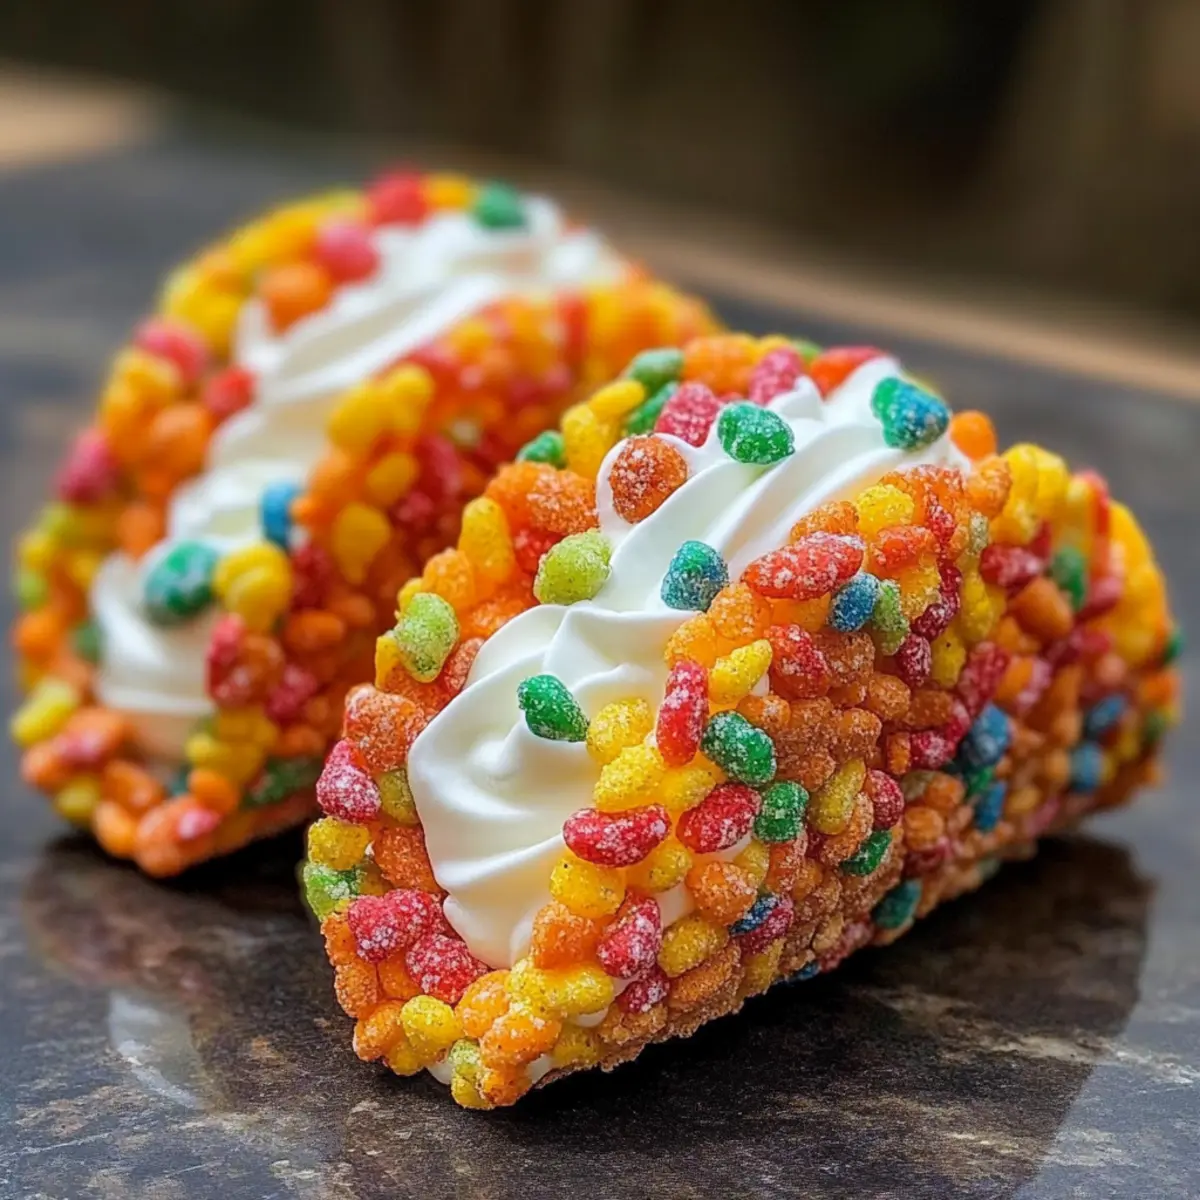
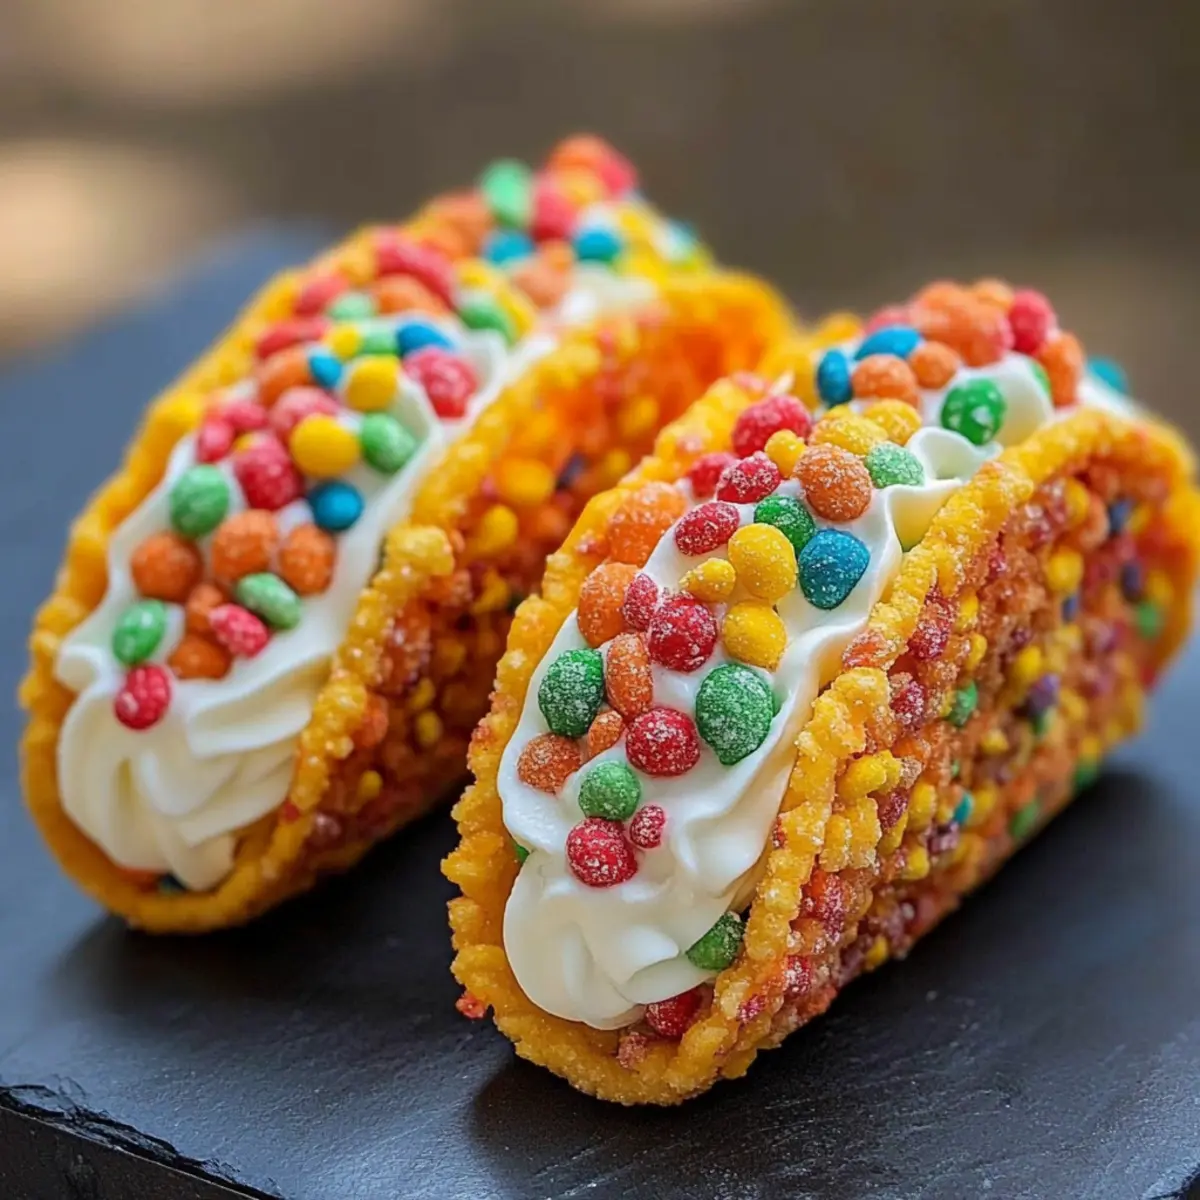
“Hey, did you ever think tacos could be a dessert?” My friend exclaimed in disbelief as I unveiled my latest creation: Fruity Pebbles Cheesecake Tacos. This colorful treat combines the irresistible crunch of taco-shaped cereal shells with a creamy, dreamy cheesecake filling, making it a showstopper at any gathering. What’s even better? These delightful desserts are super easy to make and customizable to fit everyone’s tastes—switch up the fruity cereal, or even add a splash of orange liqueur for an adult twist! Perfect for a fun family activity or a whimsical addition to your dessert table, these Fruity Pebbles Cheesecake Tacos will add a splash of color and joy to any occasion. Ready to dive into this fun recipe and impress your taste buds? Let’s get started!

Why are Fruity Pebbles Cheesecake Tacos a must-try?
Uniqueness: These tacos turn the idea of dessert on its head, offering a fun, playful twist that’s sure to delight everyone.
Colorful Presentation: Vibrant colors make these tacos visually irresistible, perfect for parties or kids’ events.
Easy to Make: The simple steps ensure a stress-free experience in the kitchen, providing a quick win for bakers of all skill levels.
Versatile Options: Switch out the cereals for endless variations, from Cocoa Pebbles to Cinnamon Toast Crunch, allowing you to personalize every batch.
Crowd-Pleasing Appeal: These tacos are bound to be a hit with all ages, making them the ideal choice for gatherings or family nights.
And if you’re looking for more colorful dessert inspiration, don’t miss my recipe for an Orange Creamsicle Cheesecake that captures the essence of fun, just like these Fruity Pebbles treats!
Fruity Pebbles Cheesecake Tacos Ingredients
For the Taco Shells
• Fruity cereal – A crunchy, colorful base that gives these tacos their fun shape; feel free to use any favorite fruity cereal.
• Unsalted butter – Binds the cereal together for a firm taco shell; margarine can be used as a substitute if needed.
For the Cheesecake Filling
• Cream cheese – The creamy heart of the filling; ensure it’s softened to room temperature for seamless mixing.
• Powdered sugar – Adds sweetness and smoothness to the filling; granulated sugar can work in a pinch if sifted well.
• Pure vanilla extract – Enhances the flavor and aroma; for a twist, almond extract can be substituted.
• Whipped cream – Lightens the filling for a fluffy texture; homemade is preferred for the best outcome, but pre-made is an option too.
For the Garnish
• Additional fruity cereal – Use this to top your tacos for that extra crunch and vibrant appeal.
With these ingredients on hand, you’re all set to whip up some delightful Fruity Pebbles Cheesecake Tacos that are sure to impress!
Step‑by‑Step Instructions for Fruity Pebbles Cheesecake Tacos
Step 1: Prepare Cereal Shells
In a large mixing bowl, melt unsalted butter until liquid, then pour it over the fruity cereal. Mix thoroughly until every piece is evenly coated, giving a glossy appearance. This mixture is the base for your taco shells. Preheat your oven to 350°F (175°C), then spread the mixture onto a baking sheet, forming a flat layer, and bake for about 10 minutes, allowing it to crisp up slightly.
Step 2: Mold Shells
Once your cereal mixture has baked, remove it from the oven and let it cool slightly for about 5 minutes. Now it’s time to mold them into taco shapes! Using taco-shaped molds or muffin tins, press the mixture firmly into the molds until it holds its shape. Chill the molds in the refrigerator for about 30 minutes to allow the shells to set properly.
Step 3: Make Filling
While the shells chill, focus on the delightful cheesecake filling. In a mixing bowl, beat softened cream cheese until it’s fluffy and creamy, free of lumps. Gradually add in the powdered sugar and pure vanilla extract, mixing until you achieve a smooth, sweet mixture. The cream cheese should be light and airy, perfect for filling your Fruity Pebbles Cheesecake Tacos.
Step 4: Fold in Whipped Cream
To give your filling that perfect texture, gently fold in whipped cream into the cream cheese mixture using a spatula. Be careful not to overmix, as you want to maintain the lightness of the whipped cream. This lightening step will create a luscious filling that contrasts beautifully with the crunchy taco shells.
Step 5: Assemble Tacos
Once the shells have firmed up in the refrigerator, remove them and carefully fill each taco shell with the cheesecake mixture using a piping bag or a spoon. Aim for generous portions that cascade over the edges, creating a mouthwatering display. Make sure each shell is filled to the brim for that delightful bite of Fruity Pebbles Cheesecake Tacos!
Step 6: Garnish and Serve
To finish your creation, sprinkle additional fruity cereal on top of each taco for a vibrant garnish and an extra crunch. These colorful treats will pop beautifully, making them irresistible! Serve immediately for the best texture, or chill them for another 15 to 30 minutes if you prefer a firmer filling. Enjoy the delightful experience of these Fruity Pebbles Cheesecake Tacos!
Storage Tips for Fruity Pebbles Cheesecake Tacos
Room Temperature: Avoid storing at room temperature for more than 2 hours to keep your scrumptious Fruity Pebbles Cheesecake Tacos safe and enjoyable.
Fridge: Store any leftover filling or taco shells separately in airtight containers in the refrigerator for up to 24 hours; this helps maintain freshness and texture.
Freezer: If you want to freeze the taco shells, do so for up to 2 weeks. Be sure to let them cool completely before wrapping them tightly in plastic wrap and foil.
Reheating: To enjoy the shells again, reheat them in the oven at 350°F (175°C) for about 5-7 minutes to restore crunchiness. For the filling, enjoy straight from the fridge—no need to reheat!
Make Ahead Options
These Fruity Pebbles Cheesecake Tacos are perfect for busy home cooks looking to save time during their meal prep. You can prepare the taco shells up to 3 days in advance by following the usual molding process and then storing them in an airtight container at room temperature to keep them crunchy. The cheesecake filling can be made up to 24 hours ahead; simply store it in the refrigerator in an airtight container to maintain its creamy texture. When you’re ready to serve, just fill the taco shells with the chilled cheesecake mixture, garnish with additional fruity cereal, and enjoy a delightful dessert that’s just as delicious as if made fresh!
Fruity Pebbles Cheesecake Tacos Variations
Feel free to play around with this recipe—your taste buds will thank you for the adventure!
-
Cocoa Pebbles: Substitute the fruity cereal with Cocoa Pebbles for a rich chocolatey twist that delights chocolate lovers. The creamy filling pairs beautifully with chocolate, creating a decadent experience.
-
Cinnamon Toast Crunch: For a spiced flavor profile, try using Cinnamon Toast Crunch as your cereal shell. This addition brings a warm, comforting flavor that makes these tacos suitable for any season.
-
Dairy-Free: Swap the cream cheese for a dairy-free alternative like cashew cream and use coconut whipped cream for a deliciously creamy filling that everyone can enjoy.
-
Adult Version: Mix in a tablespoon of orange liqueur into the cheesecake filling to create an adult-oriented delight. Garnish with orange zest for an aromatic finish that enhances the flavors beautifully.
-
Nutty Crunch: Add chopped nuts, like pecans or almonds, to the cereal mixture before molding your taco shells. This will give a delightful crunch that contrasts perfectly with the creamy filling.
-
Fruit Boost: Fold in some finely chopped fresh fruits, like strawberries or bananas, into your cheesecake filling. This will add a fresh burst of flavor and a nice texture to your dessert tacos.
-
Spicy Kick: For those who like it hot, add a pinch of cayenne or chili powder to the creamy filling. The unexpected warmth will surprise and delight adventurous eaters!
-
Pudding Layer: Incorporate layers of flavored pudding (like vanilla or banana) under the cheesecake filling. This will create additional flavor depth and a creamy layer of sweetness that elevates the dish.
And if you’re looking for more playful dessert inspirations, consider trying my Orange Creamsicle Cheesecake for yet another colorful treat that’s sure to impress!
Expert Tips for Fruity Pebbles Cheesecake Tacos
-
Ensure Soft Cream Cheese: Let your cream cheese sit at room temperature for at least an hour before mixing to avoid lumps in your filling.
-
Don’t Overmix Whipped Cream: Gently fold in the whipped cream to keep your filling light and airy. Overmixing can lead to a dense texture.
-
Chill Shells Properly: Make sure to chill the molded taco shells for at least 30 minutes for them to hold their shape when filled.
-
Fill Just Before Serving: Assemble your Fruity Pebbles Cheesecake Tacos no more than four hours prior to serving to keep the shells crunchy and fresh.
-
Experiment with Cereals: Don’t hesitate to swap in different cereals for the shells; Cocoa Pebbles or Cinnamon Toast Crunch bring unique flavors while keeping the fun alive!
What to Serve with Fruity Pebbles Cheesecake Tacos
Add a splash of color and flavor to your dessert table with these delightful pairings that perfectly complement each other.
-
Fresh Berries: Their tartness balances the sweetness of the tacos, making for a refreshing bite. Strawberries, blueberries, or raspberries can add vibrant colors and textures.
-
Whipped Cream: Serve a dollop of fluffy whipped cream alongside for an extra layer of lightness and creaminess. Sprinkling some colorful sprinkles on top can elevate the festive vibe!
-
Vanilla Ice Cream: This classic pairing turns your dessert into a sundae delight! The creamy richness of the ice cream complements the cheesecake filling beautifully.
-
Fruit Salad: A fresh fruit salad made with seasonal fruits can provide a juicy, refreshing contrast to the rich flavors of the tacos. It’s a perfect way to add a lively, healthy touch to your dessert spread.
-
Sparkling Juice: Enhance the fun factor with a glass of sparkling juice or a fruity mocktail. The fizz and flavors will elevate the celebration, making it feel like a party!
-
Chocolate Sauce: For those with an adventurous palate, drizzle chocolate sauce over the tacos for a decadent touch. The sweetness of the chocolate combined with the fruity flavor creates a delightful contrast.
-
Mini Lemon Tarts: These tangy tarts can add a zesty contrast to the sweetness of the tacos, creating a fun flavor journey in your dessert selection.
-
Coffee or Tea: A warm cup of coffee or tea can balance out the sweetness. Opt for a lightly brewed option to cleanse your palate between bites of the rich tacos.
-
Cookies: Mini cookies, especially sugar or butter varieties, create a delightful crunch alongside the creamy tacos. They’re a whimsical addition sure to please all ages.
Fruity Pebbles Cheesecake Tacos Recipe FAQs
What type of fruity cereal works best for the taco shells?
Absolutely! You can use any colorful, fruity cereal you adore. Fruity Pebbles are a classic choice, but feel free to experiment with similar cereals like Trix or Froot Loops for a vibrant twist!
How should I store leftover Fruity Pebbles Cheesecake Tacos?
To keep these delightful treats fresh, it’s best to store the filling and taco shells separately. The filling can be kept in an airtight container in the refrigerator for up to 24 hours, while the taco shells need to be stored in an airtight container at room temperature for up to 2 days. This way, the shells will remain crunchy!
Can I freeze the taco shells or filling?
Definitely! You can freeze the taco shells for up to 2 weeks—just make sure they’re completely cooled before wrapping them tightly in plastic wrap and foil. When you’re ready to enjoy them again, reheat in the oven at 350°F (175°C) for about 5-7 minutes. As for the filling, I wouldn’t recommend freezing it, but you can keep it in the fridge and enjoy it freshly made!
What should I do if my whipped cream becomes too runny?
No worries! If your whipped cream is too runny, it’s likely that it has been overmixed or not whipped enough initially. For a fix, you can try folding in an additional tablespoon or two of powdered sugar to stabilize it. If it’s still too liquid, consider using a bit of gelatin as a thickener—just dissolve one teaspoon of gelatin in a tablespoon of hot water, let it cool slightly, and fold it into the mixture gently.
Are Fruity Pebbles Cheesecake Tacos suitable for vegetarians?
Yes, they are! All the ingredients in this recipe are vegetarian-friendly. However, if you decide to incorporate orange liqueur for an adult twist, just be sure to keep that in mind when serving to others. Enjoy this fun and colorful treat without any worries!
Fruity Pebbles Cheesecake Tacos: A Colorful Dessert Delight
Ingredients
Equipment
Method
- In a large mixing bowl, melt unsalted butter until liquid, then pour it over the fruity cereal. Mix thoroughly until every piece is coated. Preheat your oven to 350°F (175°C). Spread the mixture onto a baking sheet and bake for about 10 minutes.
- Remove from the oven and let cool for about 5 minutes. Press the mixture into taco-shaped molds or muffin tins and chill in the refrigerator for 30 minutes.
- In a mixing bowl, beat softened cream cheese until fluffy. Gradually add powdered sugar and vanilla extract, mixing until smooth.
- Gently fold in whipped cream to the cream cheese mixture using a spatula, being careful not to overmix.
- Fill each taco shell with the cheesecake mixture using a piping bag or spoon. Ensure generous portions.
- Sprinkle additional fruity cereal on top for garnish. Serve immediately or chill for another 15 to 30 minutes.
Leave a Reply