
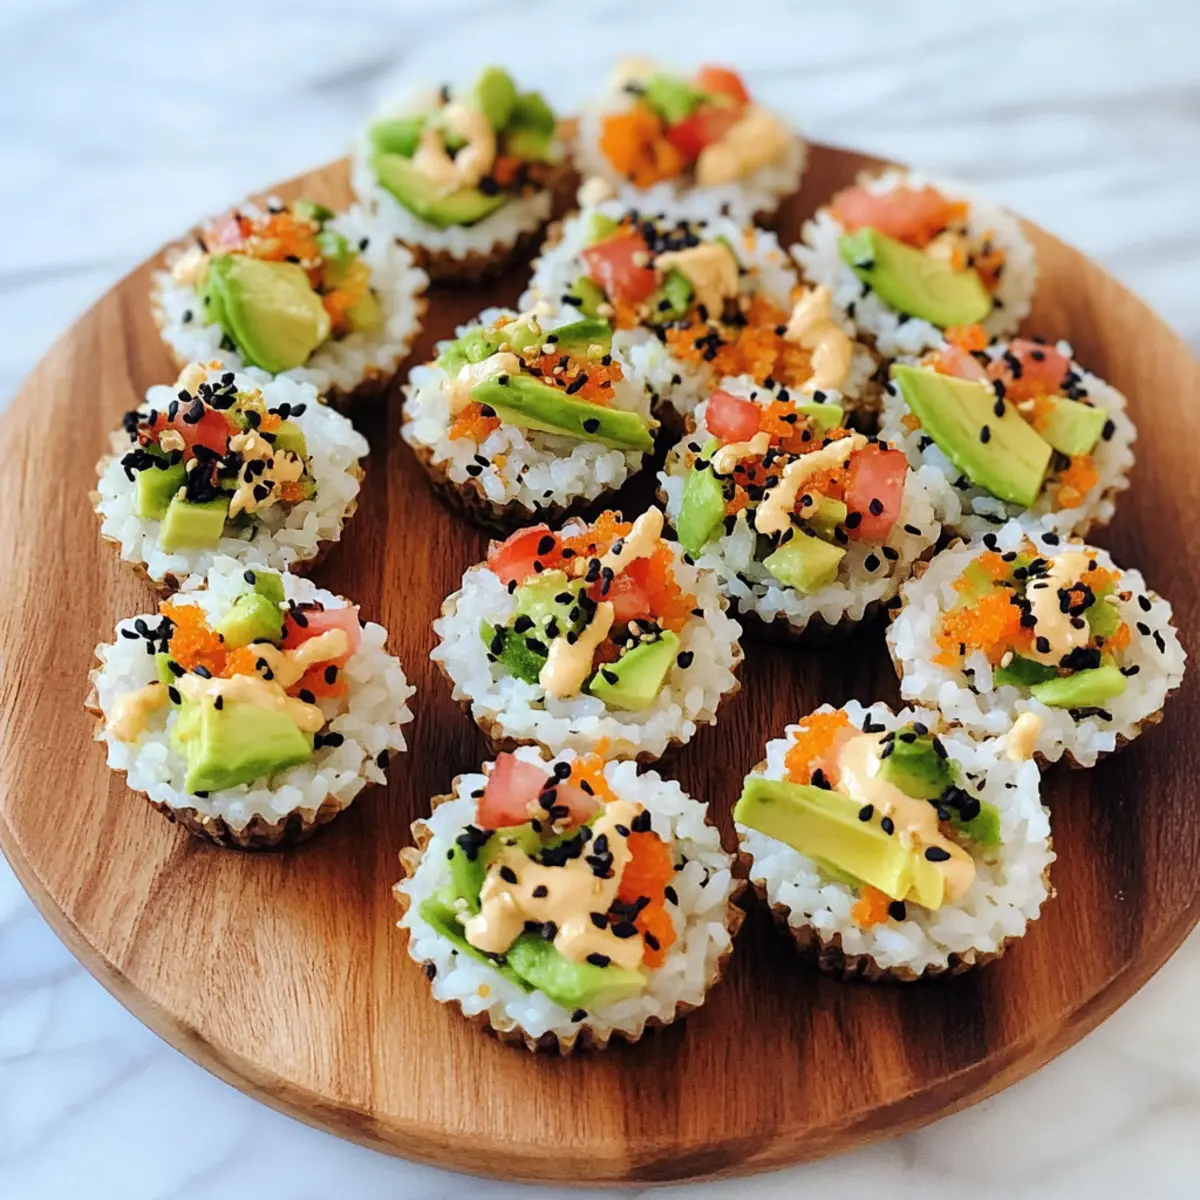
As I glanced over the vibrant array of fresh vegetables spilling from my kitchen counter, inspiration struck! Sushi Cups became my go-to answer for satisfying sushi cravings without the fuss of rolling. These no-bake delights wrap a springy rice base around colorful, crunchy veggies, creating a perfect balance of textures that’s both light and satisfying. Plus, you can easily customize them to suit your tastes or dietary needs—whether you’re vegetarian, gluten-free, or just looking for a fresh twist on your favorite flavors. These sushi cups are a quick, no-fuss way to impress guests or enjoy a light meal on any busy day. What delicious ingredients will you choose to make these your own?
Why Choose These Sushi Cups?
Customizable for every palate, these sushi cups allow you to mix and match your favorite ingredients, ensuring every bite is uniquely yours. No-Bake means less time in the kitchen and more time enjoying! Perfect as a light meal or snazzy appetizer, they’re a hit at gatherings. You can easily prep them ahead of time, making them ideal for parties or busy weeknights—just like my delicious Yogurt Granola Cups that you can whip up in a flash! Fresh and Vibrant, each cup bursts with color and flavor, bringing excitement to your table. Whether you’re a culinary novice or a seasoned chef, these sushi cups will amaze your family and friends!
Sushi Cups Ingredients
For the Rice Base
- Sushi Rice – This is the key ingredient for structure; don’t forget to rinse it thoroughly to achieve the perfect texture!
- Water – Essential for cooking the rice to fluffy perfection.
For the Fillings
- Finely Chopped Veggies – Choose your favorites like carrots, cucumber, or bell peppers for delightful crunch!
- Steamed Mukimame (Shelled Edamame) – Packed with protein, this adds a nutritious punch; swap with regular shelled edamame if needed.
- Diced Avocado – Use half a small avocado for a rich, creamy texture that complements the other ingredients.
For the Sauces
- Sauce of Choice – Enhance umami flavor with soy sauce, tamari, or coconut aminos.
- Mayonnaise – The base for your spicy mayo, bringing creaminess to the mix.
- Sriracha Sauce – Spice it up! Adjust to your preference for heat.
- Honey (optional) – A touch of sweetness can balance the flavors.
- Sesame Oil – Adds a rich depth of flavor to your mayo.
For the Garnish
- Black Sesame Seeds – Sprinkled on top, they add visual appeal and a nutty taste that elevates your sushi cups.
Step‑by‑Step Instructions for Sushi Cups
Step 1: Cook the Sushi Rice
In a medium pot, combine 1 cup of rinsed sushi rice with 1 ¼ cups of water. Bring to a boil over medium-high heat, then cover with a tight-fitting lid and reduce to low heat. Let it simmer for 20 minutes until the water is absorbed and the rice is tender. Once done, remove from heat and let it sit for an additional 10 minutes to cool slightly.
Step 2: Prepare the Rice Cups
Lightly grease a muffin tin or use silicone muffin liners for easy removal. Scoop 2 tablespoons of the cooled sushi rice into each muffin cup, pressing firmly to form a base. Ensure they are packed tightly to hold their shape. Refrigerate the filled muffin cups for about 20 minutes, allowing them to set while you prepare the fillings.
Step 3: Mix the Filling Ingredients
In a large mixing bowl, combine your finely chopped veggies, steamed mukimame, and diced avocado. Drizzle your sauce of choice over the mixture—soy sauce, tamari, or coconut aminos work beautifully. Gently toss the ingredients together until evenly coated, ensuring every bite of your sushi cups is bursting with flavor.
Step 4: Whip Up the Spicy Mayo
In a separate bowl, whisk together mayonnaise, sriracha sauce, a splash of sesame oil, and honey if desired. Taste the spicy mayo and adjust the sriracha to your preferred level of heat. Give it a good stir until creamy and well combined—this sauce will add a delightful kick to your sushi cups!
Step 5: Assemble the Sushi Cups
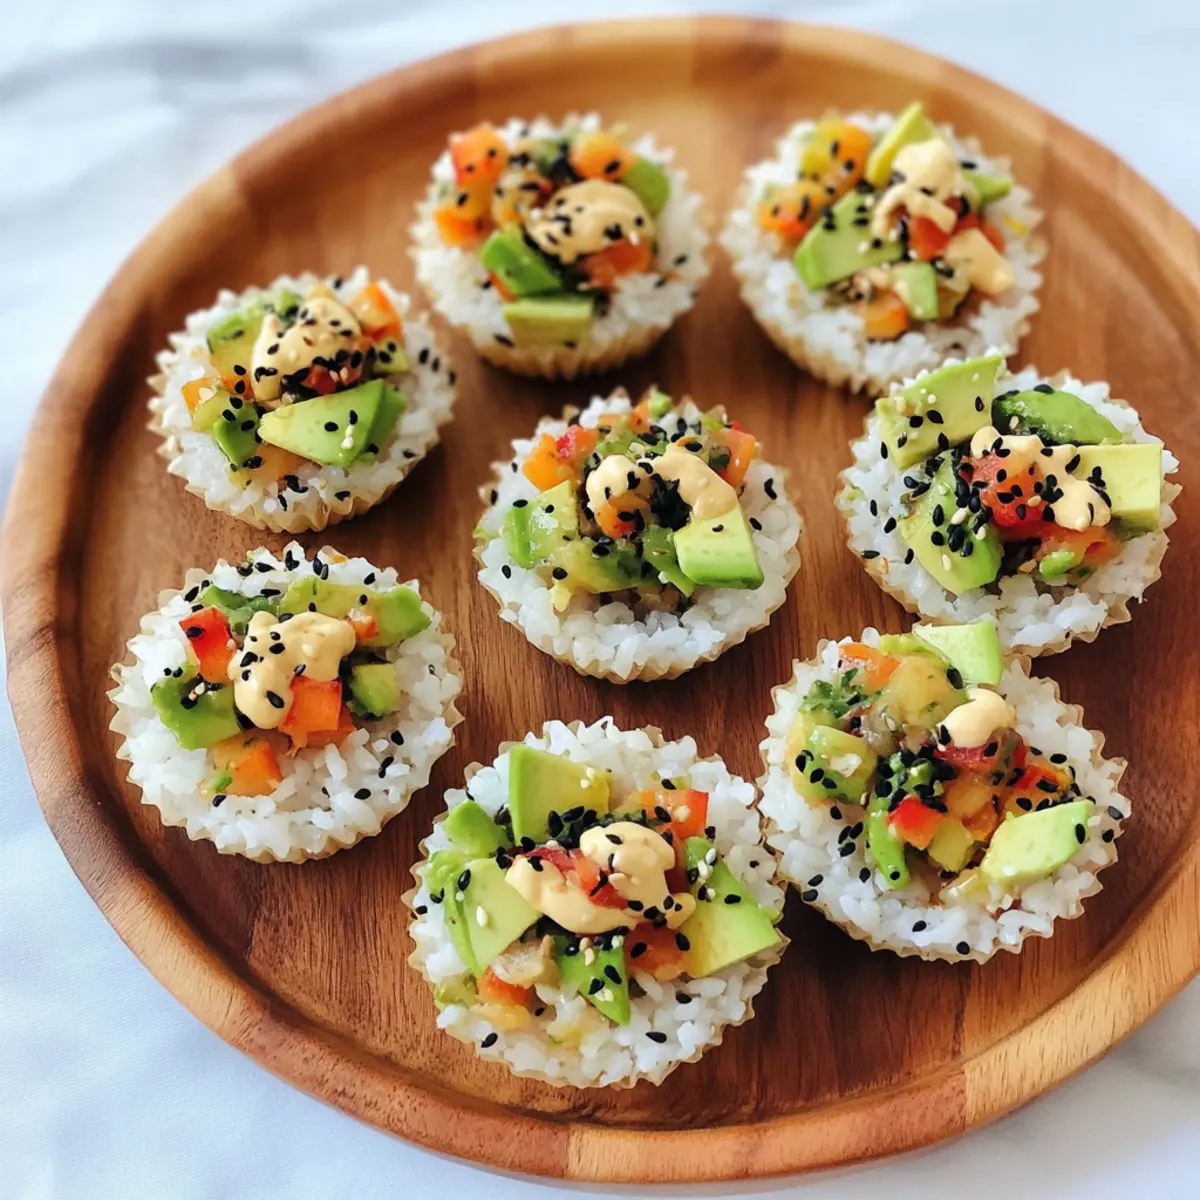
Remove the rice cups from the refrigerator and gently lift them from the muffin tin. Fill each cup generously with the veggie mixture, packing it in without overfilling. Drizzle a spoonful of the spicy mayo on top of each sushi cup, ensuring every bite enjoys a hint of creamy heat.
Step 6: Garnish and Serve
Sprinkle black sesame seeds over the tops of each sushi cup for an added crunch and an eye-catching finish. Serve immediately as light snacks or appetizers, and enjoy the delightful blend of creamy, crunchy, and umami flavors in your homemade sushi cups!

Make Ahead Options
These sushi cups are perfect for meal prep enthusiasts! You can prepare the sushi rice and pack it into muffin tins up to 24 hours in advance; simply cover with plastic wrap and refrigerate. The vegetable filling can also be mixed a day ahead—just chop your veggies and combine them with the mukimame and avocado, storing it in an airtight container until ready to use. To maintain quality, make sure to drizzle the spicy mayo just before serving to keep the rice cups from becoming soggy. When you’re ready to enjoy, fill each rice cup with the veggie mixture, top with spicy mayo, and serve for impressively fresh résultats with minimal effort!
Sushi Cups: Customizable Delights
Get ready to unleash your culinary creativity—these sushi cups are a fantastic canvas for all your favorite flavors and textures!
- Vegetarian: Swap in diced tofu or tempeh for a hearty, plant-based protein boost in your filling.
- Gluten-Free: Use tamari or coconut aminos instead of traditional soy sauce for a gluten-free option that still packs a punch.
- Heat it Up: Mix in a dash of wasabi into your spicy mayo for an extra layer of heat and flavor that will awaken your taste buds!
- Sweet Twist: Add a few slices of mango or pineapple to your veggie mix for a delightful sweet-and-savory combination; they pair beautifully with the creaminess of avocado.
- Crunch Factor: For added texture, toss in some chopped nuts, such as almonds or cashews, to the veggie mixture—a surprising crunch you’ll love!
- Herb Infusion: Fresh herbs like cilantro or mint can elevate the flavor profile—scatter them over your filling for a herbaceous punch!
- Sushi Roll Vibes: To recreate classic sushi roll flavors, incorporate cream cheese and smoked salmon into your filling. It’s a luxurious take that’s packed with flavor.
- Pairing Suggestion: Serve alongside a refreshing cucumber salad or my delightful Yogurt Granola Cups for a light and exquisite meal.
Your sushi cups will shine brightest when you adapt them to your taste! What combinations will you try today?
Storage Tips for Sushi Cups
Fridge: Store leftover sushi cups in an airtight container in the refrigerator for up to 2 days to keep them fresh and flavorful.
Make-Ahead: You can prepare the rice bases and fillings separately, storing them in the fridge, then assemble right before serving to maintain texture.
Freezer: For longer storage, freeze the rice cups without the fillings. Wrap them tightly and they can last up to a month.
Reheating: To enjoy leftover sushi cups, simply thaw in the fridge overnight and serve chilled, or keep the filling separate and fill fresh rice bases if preferred.
Tips for the Best Sushi Cups
-
Use Quality Rice: A key to perfect sushi cups is using good quality sushi rice. This enhances texture and flavor, providing a satisfying base.
-
Don’t Skip Rinsing: Always rinse the sushi rice thoroughly before cooking to remove excess starch. This will prevent your rice cups from becoming gummy.
-
Press Firmly: When forming the rice bases, press the sushi rice firmly into the muffin cups. This ensures they hold their shape and makes filling easier.
-
Customize Fillings: Feel free to mix and match your favorite ingredients! Utilize seasonal veggies or add plant-based proteins to tailor these sushi cups to your taste.
-
Adjust Spiciness Carefully: When making the spicy mayo, start with a small amount of sriracha. You can always add more, but it’s hard to tone down the heat!
-
Be Creative with Garnishes: Don’t just stick to black sesame seeds; consider adding sliced green onions, toasted seaweed, or even pickled ginger for extra flavor and flair in your sushi cups.
What to Serve with Customizable No-Bake Sushi Cups?
These sushi cups create a delightful foundation for a fun, vibrant meal that invites flavor and creativity to your table.
- Crispy Seaweed Salad: A refreshing side that contrasts the cool sushi cups while adding umami depth and a hint of ocean breeze.
- Soy-Glazed Edamame: These tender-edamame pods coated in a sweet soy glaze provide a satisfying crunch and a protein-packed companion.
- Pickled Ginger: Bright and zesty, pickled ginger adds a vibrant zing that complements the creamy avocado and spicy mayo perfectly. Serve on the side for an extra burst of flavor.
- Miso Soup: Warm and comforting, a light bowl of miso soup rounds out the meal and provides a soothing contrast to the fresh, cool sushi cups.
- Sake or Sparkling Water: Pair these sushi cups with a chilled sake or refreshing sparkling water infused with lime for a crisp beverage option that cleanses the palate.
- Cucumber Sunomono Salad: This tangy, sweet cucumber salad adds a refreshing note and balances the flavors with its lightness. Perfect during warm months!
- Sesame Noodles: Cold sesame noodles are a delicious, nutty side dish that enhances the Japanese theme while providing a satisfying texture contrast.
- Fresh Fruit Platter: End the meal on a sweet note. A mix of ripe berries, melon, and citrus provides a burst of freshness and sweetness that harmonizes beautifully with the sushi cups.
Customizable No-Bake Sushi Cups Recipe FAQs
How do I choose the best sushi rice?
Absolutely! When selecting sushi rice, look for short-grain Japanese rice, which is sticky and perfect for holding your sushi cups together. I recommend checking for any brand that mentions “sushi rice” on the package; this ensures you’re getting the right texture. Make sure the grains are plump and white, without any discoloration.
What are the best storage methods for leftover sushi cups?
To keep your sushi cups fresh, store leftovers in an airtight container in the refrigerator for up to 2 days. This helps maintain their flavor and crunch. I often use glass containers, as they provide an excellent seal and visibility. Just be sure to consume them within the timeframe for the best taste!
Can I freeze sushi cups, and how do I do it?
Yes! For freezing, prepare the rice cups without fillings. Allow them to cool completely, then wrap each one tightly in plastic wrap or place them in a freezer-safe bag. They can last up to 3 months in the freezer. When you’re ready to enjoy them, thaw in the refrigerator overnight. For the freshest taste, fill them with your veggie mixture just before serving.
What if my rice cups are falling apart after cooking?
Very! If your sushi cups aren’t holding together, it could be due to not rinsing the rice thoroughly or not packing the rice firmly enough in the muffin tin. Ensure you rinse your sushi rice to remove excess starch, and when forming the cups, press down firmly with a spoon. This creates a sturdy base that will hold all your delicious fillings nicely.
Are there any dietary considerations for pets or allergies?
It’s always wise to be cautious! The ingredients in these sushi cups are generally safe for most people, but be mindful of allergies to soy, wheat, or shellfish if you’re adding protein like imitation crab or shrimp. As for pets, avocado and onion (if you choose to add green onions) can be harmful to dogs and cats, so it’s best to keep them away from your sushi cups. Adjust the recipe to ensure it’s pet-friendly if you have furry friends around!
How can I adjust the spiciness of the spicy mayo?
Of course! Start with a smaller amount of sriracha, perhaps just 1 teaspoon mixed into your mayonnaise, and then taste it. You can always add more spice, but it’s tough to reduce the heat once it’s mixed in. If you want a milder option, consider using a mixture of Greek yogurt and mayonnaise as a base and then adjusting the sriracha to your liking. Enjoy creating your perfect kick!

Customizable Sushi Cups for Easy No-Bake Delights
Ingredients
Equipment
Method
- In a medium pot, combine sushi rice with water. Bring to a boil over medium-high heat, cover, and reduce to low heat. Simmer for 20 minutes, then let sit for 10 minutes.
- Lightly grease a muffin tin. Scoop 2 tablespoons of cooled sushi rice into each muffin cup, pressing firmly to form a base. Refrigerate for about 20 minutes.
- In a bowl, mix finely chopped veggies, steamed mukimame, and diced avocado. Drizzle your sauce of choice and toss until coated.
- In another bowl, whisk together mayonnaise, sriracha, sesame oil, and honey if using. Adjust sriracha for desired heat.
- Remove rice cups from the fridge, fill each with veggie mixture, drizzle spicy mayo on top.
- Sprinkle black sesame seeds on each sushi cup and serve immediately.
Leave a Reply