
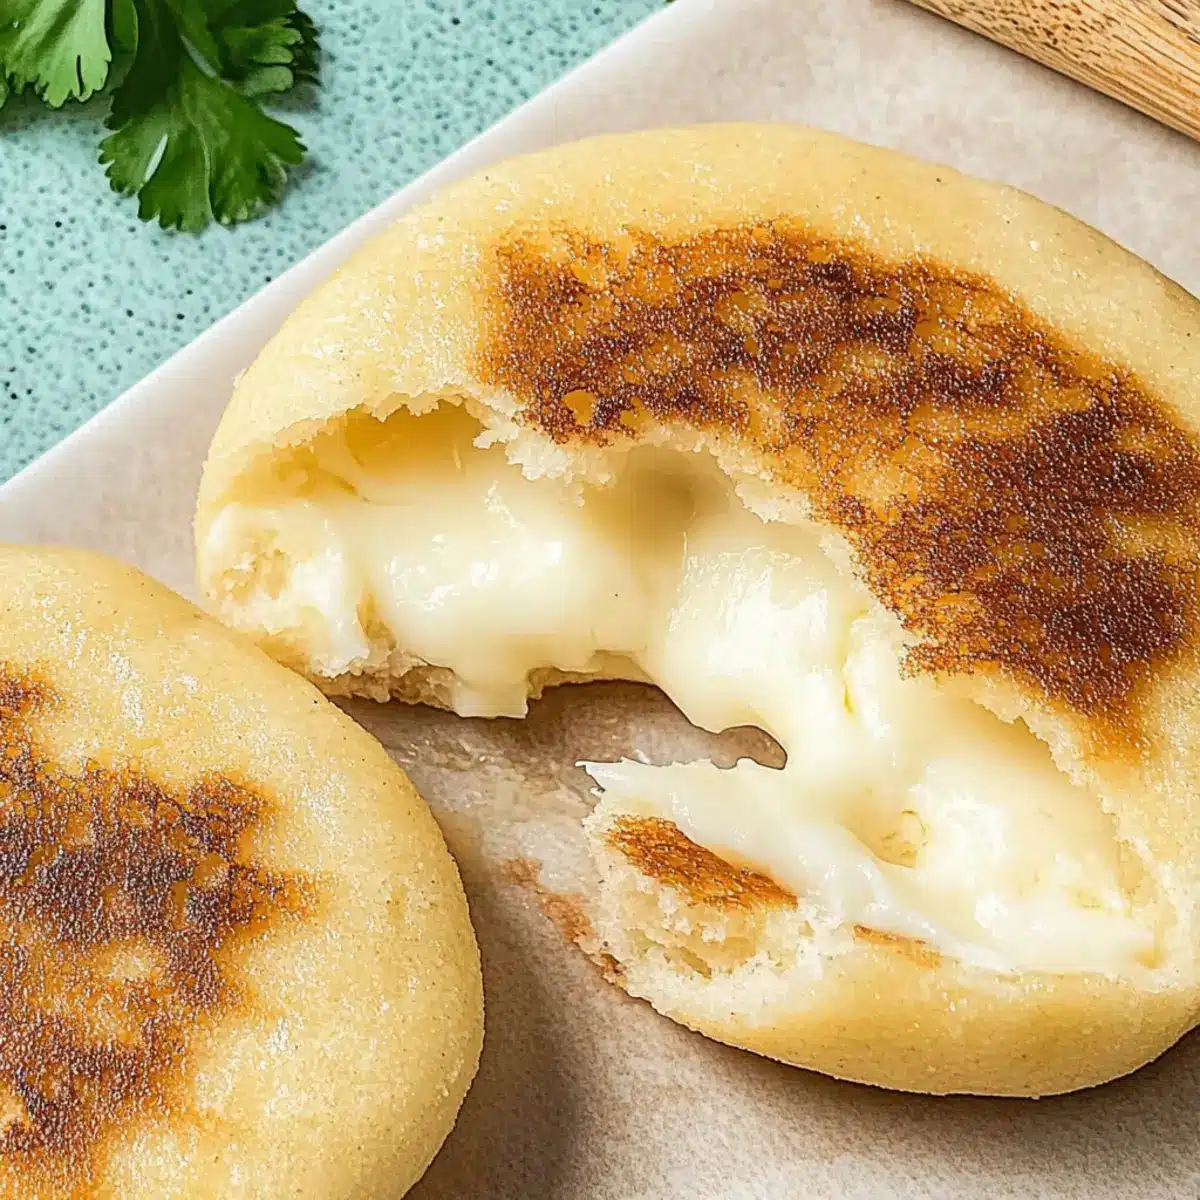
As I sipped my morning coffee, the aroma of freshly cooked corn wafted through my kitchen, transporting me straight to the vibrant streets of Colombia. What took shape during that moment was nothing short of magic—Cheesy Arepas con Queso, the ultimate comfort food for anyone who craves a taste of Latin American cuisine. These delightful corn cakes, filled with ooey-gooey cheese, boast a crispy exterior that contrasts perfectly with their fluffy, warm insides. What’s even better? They come together in no time, making them a quick and satisfying option for breakfast or a snack anytime you please. Plus, they’re naturally gluten-free, so everyone can enjoy this homemade treat! What fillings will you create to make your arepas truly unique?

Why Arepas con Queso Are Irresistible?
Simplicity, preparing these cheesy delights is a breeze! With just a handful of ingredients, even novice cooks can whip up an impressive dish. Savory goodness flourishes in every bite, thanks to the rich Cotija and melty mozzarella. Versatility shines as you can customize fillings to your heart’s content—add avocado or seasoned meats for a twist! Crowd-pleaser status is guaranteed; serve these to family or friends, and watch them disappear in an instant! For similar flavors, consider pairing your arepas with a refreshing Coconut Lime Fish dish, enhancing the Latin American culinary experience.
Arepas con Queso Ingredients
For the Dough
- Masarepa – Essential for arepas; this pre-cooked cornmeal provides the perfect structure.
- Sea Salt – Enhances flavor and balances sweetness; kosher salt can be substituted if preferred.
- Cotija Cheese – Adds a rich, salty flavor; crumbled for easy incorporation.
- Butter – Used for flavor and richness in the dough; margarine can be a dairy-free alternative.
- Warm Water – Hydrates the masarepa to form a smooth dough; adjust as needed for the right consistency.
For the Filling
- Mozzarella Cheese – Provides a creamy, stretchy texture; feel free to swap it for Monterey Jack or cheddar.
For Cooking
- Oil or Butter – For frying and achieving a golden, crispy surface; any neutral oil or lard can be used.
Embrace the joy of cooking with these arepas con queso ingredients and let your kitchen fill with delightful aromas!
Step‑by‑Step Instructions for Arepas con Queso
Step 1: Prepare the Dough
In a medium bowl, combine 2 cups of masarepa, 1 teaspoon of sea salt, and 1 cup of warm water. Mix in ½ cup of crumbled Cotija cheese and 2 tablespoons of softened butter until a smooth dough forms. Cover the bowl with a kitchen towel and let the dough rest for 10 minutes, allowing it to hydrate fully for that perfect consistency.
Step 2: Adjust Dough Consistency
After the resting period, check the dough’s texture. If it feels dry, gradually add a bit more warm water, one tablespoon at a time, until it becomes pliable and easy to handle. Knead it gently to ensure all ingredients are well-incorporated, creating a soft and manageable dough for your arepas con queso.
Step 3: Shape the Arepas
Divide the dough into 8 equal pieces and roll each piece into a ball. Then, flatten each ball into a circle about 5 inches in diameter. The edges should be smooth, ensuring the filling stays put during cooking. Feel free to create a little thicker border if you prefer a plushier arepa; they’ll cook beautifully either way!
Step 4: Fill the Arepas
Take one of the circles, and place about 2 tablespoons of shredded mozzarella cheese in the center. Gently cover it with another dough circle, pressing the edges to seal, forming a filled disk. Make sure to press firmly for a secure seal so that your delicious cheese doesn’t escape while cooking.
Step 5: Heat for Cooking
In a skillet, heat 2 tablespoons of oil or butter over medium-low heat. If you have an electric griddle, preheat it to 325°F. Once hot, you’re ready to cook those beautiful cheese-filled arepas con queso to perfection, achieving a delightful golden crust.
Step 6: Cook the Arepas
Carefully place the stuffed arepas in the heated skillet, allowing them to cook for about 4-5 minutes on one side, or until golden brown and crispy. Flip them gently using a spatula and repeat on the other side, ensuring they reach a lovely golden hue all around.
Step 7: Serve Warm
Once both sides of your arepas con queso are beautifully crisped, remove them from the skillet and let them cool slightly before serving. These cheesy delights are best enjoyed warm, so pair them with avocado slices, salsa, or a drizzle of sour cream for a truly satisfying experience!

What to Serve with Cheesy Arepas con Queso
Elevate your meal with delightful sides that harmonize with the comforting flavors of cheesy arepas.
-
Creamy Avocado Salad: This refreshing side mixes ripe avocados with lime juice and cilantro, adding a vibrant contrast to the richness of arepas. Each bite of buttery avocado balances the crispy texture perfectly!
-
Spicy Salsa Verde: A zesty salsa verde packs a punch with tomatillos and jalapeños, enhancing your cheesy arepas’ savory goodness. Dipping them in salsa brings an extra layer of flavor that’ll exhilarate your taste buds!
-
Mango Chutney: The sweet and tangy notes of mango chutney provide a delightful contrast, complementing the savory cheese-filled corn cakes. The sweetness of the mango adds a touch of brightness to your meal.
-
Roasted Black Beans: Earthy black beans seasoned with cumin and lime offer a protein-packed accompaniment that pairs beautifully with cheesy arepas. Their creamy texture rounds out the meal beautifully.
-
Crispy Plantain Chips: These crunchy, lightly salted chips bring a delightful crunch that contrasts with the soft, cheesy interior of your arepas. Serve them with a garlic dip for an added flavor experience!
-
Refreshing Agua Fresca: Quench your thirst with a fruity agua fresca made from fresh watermelon or hibiscus. The refreshing flavors cleanse your palate and enhance the overall dining experience.
-
Coconut Flan: For dessert, indulge in a creamy coconut flan, whose silky texture and subtle sweetness perfectly round off your Latin-inspired meal. This delightful treat leaves everyone smiling!
How to Store and Freeze Arepas con Queso
Fridge: Keep any leftover arepas con queso in an airtight container in the refrigerator for up to 3 days to maintain their flavor and texture.
Freezer: Store cooked arepas con queso in a single layer on a baking sheet until frozen solid, then transfer to a freezer bag for up to 2 months.
Reheating: To reheat, place frozen arepas directly in a toaster oven or preheated regular oven at 350°F for about 10-15 minutes, until heated through and crispy.
Note: To maintain freshness, remember to freeze the arepas soon after cooking.
Expert Tips for Arepas con Queso
-
Use the Right Flour: Ensure to use masarepa instead of masa harina for authentic texture. The difference is crucial for the best arepas con queso.
-
Check Dough Consistency: If your dough feels dry, slowly add warm water until it’s pliable. A perfect dough ensures a soft, fluffy interior.
-
Moisten Hands: To prevent sticking while shaping your arepas, wet your hands with a bit of water. This makes handling the dough much easier.
-
Cooking Temperature: Cook over medium-low heat; too high can burn the outside before the cheese melts. Patience yields golden-brown goodness!
-
Experiment with Fillings: Feel free to add herbs or spices to the dough or mix in different cheeses. This enhances flavor and creates unique variations of arepas con queso.
Arepas con Queso Variations & Substitutions
Let your creativity shine as you customize your arepas with these delightful twists and substitutions!
- Dairy-Free: Substitute Cotija and mozzarella cheeses with dairy-free cheese alternatives for a plant-based version.
- Herb-Infused Dough: Add fresh herbs like cilantro or chives to the dough for an aromatic and flavorful twist that elevates every bite.
- Spicy Kick: Incorporate diced jalapeños or crushed red pepper flakes directly into the filling, perfect for those who crave a little heat.
- Savory Meats: Add cooked chorizo or shredded chicken inside your arepas before sealing them for a heartier meal option.
- Corny Delight: Incorporate sweet corn kernels into the dough for an extra burst of flavor and texture that complements the cheese beautifully.
- Flavorful Spices: Mix in cumin or smoked paprika into the dough to give your arepas a delightful smoky flavor that pairs wonderfully with the cheese.
- Cheese Variety: Experiment with sharp cheddar or a mix of different cheeses for diverse flavors and textures in your filling.
- Sweet Option: For a dessert twist, fill your arepas with sweetened cream cheese or Nutella, topped with fruit slices for a delightful treat that transforms your meal.
As you savor these versatile arepas, consider serving them alongside an enticing dish like Coconut Lime Fish for a delightful fusion of flavors that takes you on a culinary journey. Enjoy the magic in every bite!
Make Ahead Options
These Cheesy Arepas con Queso are ideal for meal prep enthusiasts looking to save time on busy weeknights! You can prepare the dough and shape the arepas up to 24 hours in advance. Simply follow the initial steps to mix the masarepa, salt, Cotija cheese, butter, and warm water into a dough, then divide and shape them. Store the uncooked arepas in an airtight container in the refrigerator to maintain their freshness. When you’re ready to delight in these cheesy treats, just heat your skillet and cook them as directed, achieving that crispy exterior and warm, gooey filling—just as delicious as if freshly made!
Arepas con Queso Recipe FAQs
What type of cornmeal should I use for arepas?
Absolutely! Make sure to use masarepa, which is pre-cooked cornmeal specifically for making arepas. Using masa harina will not yield the same desired texture and flavor for your arepas con queso.
How long can I store leftover arepas con queso?
Leftover arepas con queso can be stored in an airtight container in the refrigerator for up to 3 days. Make sure they are at room temperature before placing them in the container to avoid condensation.
Can I freeze arepas con queso?
Yes! To freeze your arepas con queso, place them in a single layer on a baking sheet and freeze until solid. Afterward, transfer them to a freezer bag, where they can be stored for up to 2 months. This method helps prevent them from sticking together.
What’s the best way to reheat frozen arepas?
For a deliciously crispy result, preheat your oven to 350°F and place frozen arepas directly in. Bake for about 10-15 minutes, flipping halfway through to ensure they are heated evenly and regain that perfectly crispy exterior.
Can I customize the fillings in my arepas?
Very! The beauty of arepas con queso is their versatility. Feel free to add fillings like seasoned meats, avocados, or even sautéed vegetables to create variations that suit your palate. Mixing in herbs or spices into the dough can also offer unique flavor profiles that elevate your dish!
Are arepas con queso suitable for people with gluten intolerance?
Yes! Arepas con queso are naturally gluten-free, given that they are made from masarepa—a corn-based flour. However, always be mindful of any pre-packaged ingredients or toppings you choose to ensure they align with gluten-free dietary needs.

Cheesy Arepas con Queso: A Warm Hug of Flavor
Ingredients
Equipment
Method
- In a medium bowl, combine 2 cups of masarepa, 1 teaspoon of sea salt, and 1 cup of warm water. Mix in ½ cup of crumbled Cotija cheese and 2 tablespoons of softened butter until a smooth dough forms.
- Check the dough's texture. If it feels dry, gradually add warm water until it becomes pliable and easy to handle.
- Divide the dough into 8 pieces and roll each into a ball. Flatten each into a circle about 5 inches in diameter.
- Place about 2 tablespoons of shredded mozzarella cheese in the center of one dough circle, then cover it with another circle and seal the edges.
- In a skillet, heat 2 tablespoons of oil or butter over medium-low heat.
- Carefully place the stuffed arepas in the skillet, cooking for 4-5 minutes on one side until golden brown, then flip and repeat.
- Remove from the skillet and let cool slightly before serving. Enjoy warm with avocado, salsa, or sour cream.
Leave a Reply